Monday, January 17, 2011

Comfort Food... Mom's Goulash


This recipe didn't come from my mom, it came from a magazine a long, long time ago. It might have been Taste of Home, but it's been so long that I can't remember now. Wherever I got it, it's definitely a keeper! My kids loved this when they were still living at home, and my husband still does.

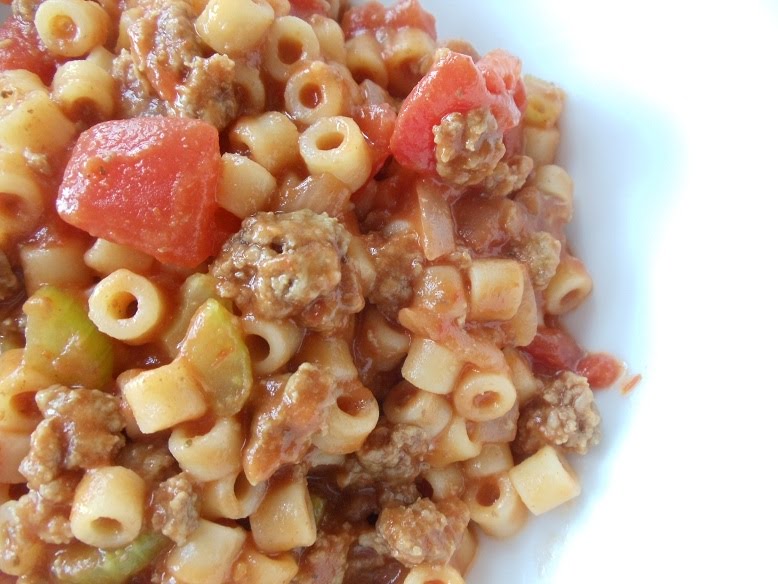
Goulash is wonderful because you can make it a little bit different every time, you don't have to follow an exact recipe. You can use regular elbow macaroni if you like, but I love the smaller Ditalini when I can find it. Ditalini is sort of like elbow macaroni chopped into smaller pieces.


The recipe given here makes a huge batch, so if you don't have a big family you can cut it in half, but keep the same size can of diced tomatoes. The tomato paste was a new addition this time because it seemed like it needed something more, but I usually don't need to use it. This is just exactly how I made what you see in the pictures.

You can change up the spices too. Sometimes I use Penzey's Smoked Spanish Paprika just to be different. You can spice it up however you like, but the one thing I would not change is the celery salt. That is what sets this apart and makes it so good. The celery seed can be left out if you don't like it, but the celery seed I use is also from Penzey's, and is more ground up so it's not like you are biting into little seeds.

Here's what I used for this batch:

1 box (1 lb) Barilla brand Ditalini pasta (or elbow macaroni)
2 pounds ground beef
1 medium onion, diced
2-3 stalks celery, diced
1 28-oz can diced tomatoes (substitute crushed tomatoes in puree if you don't like big chunks of tomatoes)
2 cans tomato soup
1 small can tomato paste
salt
celery salt
celery seed
Penzey's 4S Seasoned Sea Salt
olive oil

Dice up the onion and celery, and cook in a little bit of oil for a few minutes. It will continue to cook along the way, so you don't want to let them get too soft. Sprinkle a little salt over it.


Add ground beef and cook until browned. Stir in the tomatoes, soup and tomato paste. Stir in spices and let it simmer.

While all that is going on, cook the pasta according to package directions. Don't let it get too done, because it will continue to cook after you add it to the tomato-ground beef mixture. Remember to salt the water generously before you cook the pasta because this is your only chance to season it. Drain it well - shake the colander. You don't want any extra water hiding inside those cute little Ditalinis - I think that may have been the reason why I felt I needed the tomato paste, I may have not drained the pasta well enough and my mixture got a little diluted. You can be the judge of how thick your goulash is and decide whether or not you need it.

Once your pasta is well drained, stir it into the tomato mixture. Let it simmer a little so the flavors will blend. I honestly think this tastes even better the next day.


Enjoy!

Monday, January 10, 2011

Trader Joe's Treats (Garlic Naan Pizza)


Those of you in the Omaha area know that Trader Joe's recently opened a store at One Pacific Place, 105th and Pacific. I've heard a lot about TJ's from friends around the country, so I was very anxious to check it out, but didn't get around to it until a couple of weeks ago. What got me to finally get down there? A recipe for Garlic Naan Pizza that I saw on Trader Joe's Facebook page. This is just one of the recipes using their products in a book called The Unofficial Guide To Trader Joe's. This one looked so good I couldn't wait to try it.. and I was not disappointed. The original recipe came from a "demo lady" in one of their stores.

Naan is a leavened, oven baked flatbread, and is one of the more popular breads in Indian and Pakistani restaurants. I had never tried it before, but now that I have I can see why it is so popular, because it is amazingly good!

This is what it looks like:


The Trader Joe's version is frozen, and comes in garlic flavor and plain. I think what makes this so good is the garlic. It even smells delicious when you open the frozen package! Of course, if you don't like garlic you could always use the plain naan. One package contains 4 pieces of naan, and the package is resealable, so you can just take out what you need and put the rest back in the freezer.

The original recipe uses Trader Joe's fresh Bruschetta for the sauce, but when I was there the bruschetta was sold out, so I improvised and used pizza sauce. Pizza sauce for a pizza... what a concept! They have a fresh pizza sauce in the refrigerated section that is one of the best I have ever tasted. I might never use anything else again - and it's reasonable priced at around $2.99 for a 10 oz tub. This was enough to make 5 of the naan pizzas.

Here is what you will need to buy:

1 package Trader Joe's frozen Garlic Naan (1 pkg has 4 pieces)


1 10-oz tub Trader Joe's fresh Pizza Sauce

1 pkg Trader Joe's Quattro Formaggio Cheese


Garlic Naan Pizza (1 serving)

1 piece frozen garlic naan (use it frozen, don't thaw it out)
2 Tablespoons pizza sauce
1/2 cup cheese

Spread the sauce over the naan, then top with cheese and bake at 400 degrees F. until bread is crispy and cheese is melted. I baked mine for 20 minutes, and next time I will cut a few minutes off that because it was a little more brown than I like, although it was still quite yummy. Just shoot for somewhere between 15 and 20 minutes, and watch it closely the first time.


I made this for my husband and topped it with some pepperoni. He's not one for trying new things, but he loved it. If you use pepperoni, put a little more cheese on top of the pepperoni - I used the "sandwich style" pepperoni and the one I didn't add more cheese to curled up and got extremely crispy. It tasted good but just didn't look very nice. I did use a bit more sauce and cheese than the recipe calls for.. actually I didn't measure anything, and I still got 5 pizzas from that tub of sauce.

It's been quite awhile since I have found something so good that is also so easy to make!

Sunday, January 2, 2011

Buttery Pecan Toffee


I know, I know, the holidays are over, but since so many unforseen things kept me from getting any cookies baked this year I thought I would share just one more of my favorite go-to recipes for Christmas treats. I have seen other toffee recipes with more ingredients, so I think it's funny that people often don't believe me when I way this is just basically nothing more than butter and sugar. When I first started making it, I probably threw out 20 pounds of butter and sugar just trying to get it right because the actual recipe just says "cook until it is the color of toffee". I had no idea how long to cook it or how high the heat should be, so I just kept trying until I got it right, and it was SO worth it. Really, it's not that hard once you get the hang of judging the color of the toffee as it cooks. If I had step by step pictures of what it was supposed to look like along the way I would have gotten it right a lot sooner... and now that I have done that for you, I am thrilled to share what I've learned!

The original recipe is called "Elegant Toffee", and it came from my sis-in-law, Sara. She brought some along one year when they came home for Christmas, and I had to have the recipe because it was ridiculously good. Her version is a bit more labor intensive, because she first pours the toffee over whole almonds, and then breaks it up after it has cooled, dips each piece in chocolate, and then rolls the whole thing in crushed walnuts. Mmm... it's not only delicious, but it looks beautiful as well. I prefer pecans though, and I wanted more toffee and less chocolate, so I adapted it to make it the way I like it, and a lot less work.

Here is what you will need to make this:

1 cup sugar

1 cup butter

Pecans (either whole or chopped.. I use chopped)

A handful of chocolate chips

Pecan meal or pecan cookie pieces (Fisher makes these, they are just really finely chopped pecans.. you could even do this yourself if you want.)

First, butter a large jelly roll pan. You can either butter the pan, line it with foil and butter the foil for easier cleanup, or use the non-stick foil. Sprinkle the pecans rather densely in the center. Whether you use chopped pecans or whole, just use a lot. You don't have to measure any certain amount.. I just think the finished toffee is better if there are a LOT of pecans in it.


Get a small, heavy saucepan. I use an old Club Aluminum pot that used to belong to my grandmother. I love it because it has a wooden handle and I think of Grandma whenever I use it.

Melt the butter and sugar together over medium-high heat. One of the problems I had at first was that my butter and sugar mixture kept separating while it was cooking. I figured out that this was because I didn't have the heat high enough. If this happens to you, just turn up your heat a little, keep stirring, and eventually it will come back together and be fine.


Once it starts melting, you absolutely MUST stir it continuously the whole time. Do not walk away from this or it won't work! The mixture will come to a bubbly boil and will look like pudding.


Keep stirring and you will notice the mixture slowly begin to change color and consistency.


Keep stirring.


This is the color you are going for:


The darkened areas are because I stopped stirring briefly to take the photo, you don't want this, so DON'T STOP STIRRING! When it turns this pretty toffee color, it does so very quickly, so watch it closely.. and did I mention that you have to keep stirring?

The moment your mixture turns this color, immediately pour it over the pecans and spread it as quickly as you can to the desired thickness. It sets up very quickly, so do the best you can. Don't worry about the bubbles, they will go away as it cools. Remember that this mixture will be extremely hot, so be very careful! It will look like a misshapen glob on your pan, and don't worry if you can't get all of the pecans covered. Just use them in the next batch. Because just one batch is never enough. Don't try to double this to save time, it won't work.


Wait a few minutes for it to set, and then sprinkle some chocolate chips over the toffee. You can see the mine have sunken in a bit, but just leave them alone and it will be fine. I use semi-sweet, but you could use milk-chocolate too if you like that better, or leave the chocolate off altogether if you don't like it. Seriously, I actually know someone who hates chocolate.. I can't make stuff like that up. Anyway, place another cookie sheet on top of your pan to help melt the chocolate more quickly, then spread it all over. Spreading chocolate all over sounds so naughty... okay, focus. Are you still with me?


While the chocolate is still nice and melty, sprinkle the finely chopped pecans on top. Once I found pecan meal in the store, which I really liked for this because the pecans were so finally ground they were almost like dust. Just a light dusting was perfect, but I have never been able to find it again, and I'm too lazy to get out whatever gadget I might need to do it myself, so I use the "cookie pieces".


It's best to let this cool overnight before you try and break it up into pieces because you want it completely cool and the chocolate needs plenty of time to cool and harden. This is one of those treats that when you take that first bite everything goes blank and all you can do is roll your eyes and say Mmmmmm.. over and over...

Follow Me on Pinterest