Monday, January 17, 2011

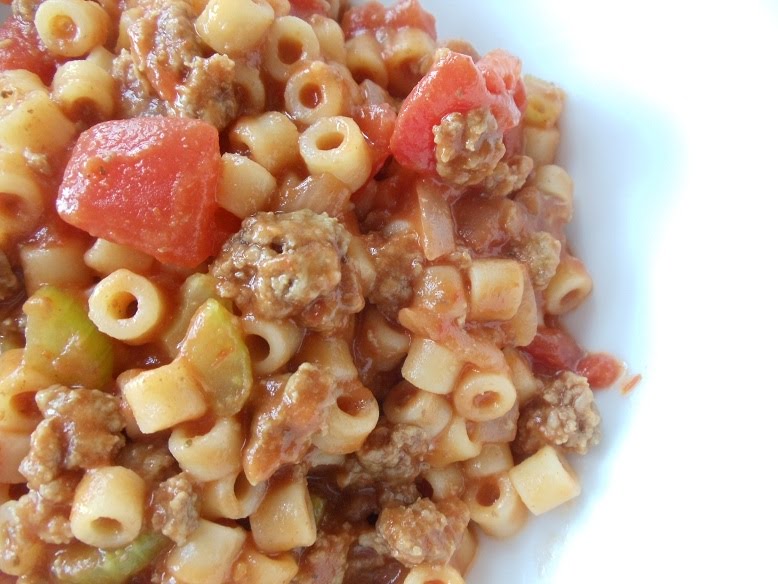
Comfort Food... Mom's Goulash


This recipe didn't come from my mom, it came from a magazine a long, long time ago. It might have been Taste of Home, but it's been so long that I can't remember now. Wherever I got it, it's definitely a keeper! My kids loved this when they were still living at home, and my husband still does.

Goulash is wonderful because you can make it a little bit different every time, you don't have to follow an exact recipe. You can use regular elbow macaroni if you like, but I love the smaller Ditalini when I can find it. Ditalini is sort of like elbow macaroni chopped into smaller pieces.


The recipe given here makes a huge batch, so if you don't have a big family you can cut it in half, but keep the same size can of diced tomatoes. The tomato paste was a new addition this time because it seemed like it needed something more, but I usually don't need to use it. This is just exactly how I made what you see in the pictures.

You can change up the spices too. Sometimes I use Penzey's Smoked Spanish Paprika just to be different. You can spice it up however you like, but the one thing I would not change is the celery salt. That is what sets this apart and makes it so good. The celery seed can be left out if you don't like it, but the celery seed I use is also from Penzey's, and is more ground up so it's not like you are biting into little seeds.

Here's what I used for this batch:

1 box (1 lb) Barilla brand Ditalini pasta (or elbow macaroni)
2 pounds ground beef
1 medium onion, diced
2-3 stalks celery, diced
1 28-oz can diced tomatoes (substitute crushed tomatoes in puree if you don't like big chunks of tomatoes)
2 cans tomato soup
1 small can tomato paste
salt
celery salt
celery seed
Penzey's 4S Seasoned Sea Salt
olive oil

Dice up the onion and celery, and cook in a little bit of oil for a few minutes. It will continue to cook along the way, so you don't want to let them get too soft. Sprinkle a little salt over it.


Add ground beef and cook until browned. Stir in the tomatoes, soup and tomato paste. Stir in spices and let it simmer.

While all that is going on, cook the pasta according to package directions. Don't let it get too done, because it will continue to cook after you add it to the tomato-ground beef mixture. Remember to salt the water generously before you cook the pasta because this is your only chance to season it. Drain it well - shake the colander. You don't want any extra water hiding inside those cute little Ditalinis - I think that may have been the reason why I felt I needed the tomato paste, I may have not drained the pasta well enough and my mixture got a little diluted. You can be the judge of how thick your goulash is and decide whether or not you need it.

Once your pasta is well drained, stir it into the tomato mixture. Let it simmer a little so the flavors will blend. I honestly think this tastes even better the next day.


Enjoy!

Monday, January 10, 2011

Trader Joe's Treats (Garlic Naan Pizza)


Those of you in the Omaha area know that Trader Joe's recently opened a store at One Pacific Place, 105th and Pacific. I've heard a lot about TJ's from friends around the country, so I was very anxious to check it out, but didn't get around to it until a couple of weeks ago. What got me to finally get down there? A recipe for Garlic Naan Pizza that I saw on Trader Joe's Facebook page. This is just one of the recipes using their products in a book called The Unofficial Guide To Trader Joe's. This one looked so good I couldn't wait to try it.. and I was not disappointed. The original recipe came from a "demo lady" in one of their stores.

Naan is a leavened, oven baked flatbread, and is one of the more popular breads in Indian and Pakistani restaurants. I had never tried it before, but now that I have I can see why it is so popular, because it is amazingly good!

This is what it looks like:


The Trader Joe's version is frozen, and comes in garlic flavor and plain. I think what makes this so good is the garlic. It even smells delicious when you open the frozen package! Of course, if you don't like garlic you could always use the plain naan. One package contains 4 pieces of naan, and the package is resealable, so you can just take out what you need and put the rest back in the freezer.

The original recipe uses Trader Joe's fresh Bruschetta for the sauce, but when I was there the bruschetta was sold out, so I improvised and used pizza sauce. Pizza sauce for a pizza... what a concept! They have a fresh pizza sauce in the refrigerated section that is one of the best I have ever tasted. I might never use anything else again - and it's reasonable priced at around $2.99 for a 10 oz tub. This was enough to make 5 of the naan pizzas.

Here is what you will need to buy:

1 package Trader Joe's frozen Garlic Naan (1 pkg has 4 pieces)


1 10-oz tub Trader Joe's fresh Pizza Sauce

1 pkg Trader Joe's Quattro Formaggio Cheese


Garlic Naan Pizza (1 serving)

1 piece frozen garlic naan (use it frozen, don't thaw it out)
2 Tablespoons pizza sauce
1/2 cup cheese

Spread the sauce over the naan, then top with cheese and bake at 400 degrees F. until bread is crispy and cheese is melted. I baked mine for 20 minutes, and next time I will cut a few minutes off that because it was a little more brown than I like, although it was still quite yummy. Just shoot for somewhere between 15 and 20 minutes, and watch it closely the first time.


I made this for my husband and topped it with some pepperoni. He's not one for trying new things, but he loved it. If you use pepperoni, put a little more cheese on top of the pepperoni - I used the "sandwich style" pepperoni and the one I didn't add more cheese to curled up and got extremely crispy. It tasted good but just didn't look very nice. I did use a bit more sauce and cheese than the recipe calls for.. actually I didn't measure anything, and I still got 5 pizzas from that tub of sauce.

It's been quite awhile since I have found something so good that is also so easy to make!

Sunday, January 2, 2011

Buttery Pecan Toffee


I know, I know, the holidays are over, but since so many unforseen things kept me from getting any cookies baked this year I thought I would share just one more of my favorite go-to recipes for Christmas treats. I have seen other toffee recipes with more ingredients, so I think it's funny that people often don't believe me when I way this is just basically nothing more than butter and sugar. When I first started making it, I probably threw out 20 pounds of butter and sugar just trying to get it right because the actual recipe just says "cook until it is the color of toffee". I had no idea how long to cook it or how high the heat should be, so I just kept trying until I got it right, and it was SO worth it. Really, it's not that hard once you get the hang of judging the color of the toffee as it cooks. If I had step by step pictures of what it was supposed to look like along the way I would have gotten it right a lot sooner... and now that I have done that for you, I am thrilled to share what I've learned!

The original recipe is called "Elegant Toffee", and it came from my sis-in-law, Sara. She brought some along one year when they came home for Christmas, and I had to have the recipe because it was ridiculously good. Her version is a bit more labor intensive, because she first pours the toffee over whole almonds, and then breaks it up after it has cooled, dips each piece in chocolate, and then rolls the whole thing in crushed walnuts. Mmm... it's not only delicious, but it looks beautiful as well. I prefer pecans though, and I wanted more toffee and less chocolate, so I adapted it to make it the way I like it, and a lot less work.

Here is what you will need to make this:

1 cup sugar

1 cup butter

Pecans (either whole or chopped.. I use chopped)

A handful of chocolate chips

Pecan meal or pecan cookie pieces (Fisher makes these, they are just really finely chopped pecans.. you could even do this yourself if you want.)

First, butter a large jelly roll pan. You can either butter the pan, line it with foil and butter the foil for easier cleanup, or use the non-stick foil. Sprinkle the pecans rather densely in the center. Whether you use chopped pecans or whole, just use a lot. You don't have to measure any certain amount.. I just think the finished toffee is better if there are a LOT of pecans in it.


Get a small, heavy saucepan. I use an old Club Aluminum pot that used to belong to my grandmother. I love it because it has a wooden handle and I think of Grandma whenever I use it.

Melt the butter and sugar together over medium-high heat. One of the problems I had at first was that my butter and sugar mixture kept separating while it was cooking. I figured out that this was because I didn't have the heat high enough. If this happens to you, just turn up your heat a little, keep stirring, and eventually it will come back together and be fine.


Once it starts melting, you absolutely MUST stir it continuously the whole time. Do not walk away from this or it won't work! The mixture will come to a bubbly boil and will look like pudding.


Keep stirring and you will notice the mixture slowly begin to change color and consistency.


Keep stirring.


This is the color you are going for:


The darkened areas are because I stopped stirring briefly to take the photo, you don't want this, so DON'T STOP STIRRING! When it turns this pretty toffee color, it does so very quickly, so watch it closely.. and did I mention that you have to keep stirring?

The moment your mixture turns this color, immediately pour it over the pecans and spread it as quickly as you can to the desired thickness. It sets up very quickly, so do the best you can. Don't worry about the bubbles, they will go away as it cools. Remember that this mixture will be extremely hot, so be very careful! It will look like a misshapen glob on your pan, and don't worry if you can't get all of the pecans covered. Just use them in the next batch. Because just one batch is never enough. Don't try to double this to save time, it won't work.


Wait a few minutes for it to set, and then sprinkle some chocolate chips over the toffee. You can see the mine have sunken in a bit, but just leave them alone and it will be fine. I use semi-sweet, but you could use milk-chocolate too if you like that better, or leave the chocolate off altogether if you don't like it. Seriously, I actually know someone who hates chocolate.. I can't make stuff like that up. Anyway, place another cookie sheet on top of your pan to help melt the chocolate more quickly, then spread it all over. Spreading chocolate all over sounds so naughty... okay, focus. Are you still with me?


While the chocolate is still nice and melty, sprinkle the finely chopped pecans on top. Once I found pecan meal in the store, which I really liked for this because the pecans were so finally ground they were almost like dust. Just a light dusting was perfect, but I have never been able to find it again, and I'm too lazy to get out whatever gadget I might need to do it myself, so I use the "cookie pieces".


It's best to let this cool overnight before you try and break it up into pieces because you want it completely cool and the chocolate needs plenty of time to cool and harden. This is one of those treats that when you take that first bite everything goes blank and all you can do is roll your eyes and say Mmmmmm.. over and over...

Follow Me on Pinterest

Wednesday, December 15, 2010

Rosemary Chicken Fried Chicken


In between all the holiday goodies we still need to eat real food. I've been on kind of a chicken kick lately, so tonight I made my own version of Chicken Fried Chicken. Yes, I actually thought of a recipe all by myself! What sets this apart from your everyday chicken fried chicken is that I use Rosemary flavored crackers for the crust.

Carr's Rosemary crackers:


You could use any kind of crackers you like, but I love the Rosemary crackers because they perfectly compliment the chicken. The only other seasoning I add is a little salt and pepper on the chicken before I coat it.

Here's what you will need to make this:


Tenderized chicken breasts

1 box Carr's Rosemary crackers

1 cup flour

2 eggs, beaten with a tablespoon of water added

salt and pepper

Oil for frying (I use Canola oil)


Crush the crackers in a ziploc bag using a rolling pin. See how pretty they are with those little bits of Rosemary? Can you even see the little bits of Rosemary? Trust me, they are there. The crackers look and smell so good I almost hate to destroy them.


Crush the crackers as finely as you can. Turn the bag over and crush them some more. Think about someone who made you mad today, it's more satisfying that way. They should look something like this:


Prepare your flour and egg wash. I used 1 cup of flour for the two chicken breasts I used. Adjust the amount as needed depending on how much you are making. Beat the eggs and water together in a separate pan. Heat the oil while you are prepping the chicken. Did you notice the white stuff in the pan of oil? It's true, I confess... I snuck a few pats of butter into the oil. Because I'm sneaky like that. Call it stealth butter.


Lightly salt and pepper your chicken. You don't need very much because the crackers are salted, but this is your only chance to season the chicken. I bought this chicken already tenderized and pre-packaged at my HyVee store, but if that's not available you can ask them to tenderize for you or do it yourself if you like to beat your food into submission. These are bigger than they look, one is more than enough for two people. I made two, but they are great as leftovers, they are even good cold. I'm guessing it will take us about 3 days to eat this.


Dredge the seasoned chicken in the flour and shake off the excess. Next, dip it in the egg wash. The flour helps the egg wash stick, and together they will act like a "glue" that will hold the cracker crumbs on the chicken, giving you a beautiful, thick, yummy crust. Dip it into the cracker crumbs last, making sure every bit of the chicken is coated and then shake off the excess crumbs. Place it in the hot oil and stand back while magic happens. If your pieces are big like these, cook them one at a time. Crowded food doesn't brown as well.


When the first side is nicely browned, very carefully turn it over. You might even want to cut the pieces in half to make them easier to work with. Just be careful that you don't splash the hot oil all over the place.


When the second side is browned (it won't take as long as the first side) carefully remove from the pan and place on a paper towel lined plate to drain the excess oil. When this is on the plate you can really appreciate how big these are. They didn't look that big when I bought them, but by the time you do the crust they are huge!


Serve with your favorite veggies and dig in!

Now... back to the cookies.

Monday, December 13, 2010

Holiday Treats


I woke up the other day and it was December. I'm not sure how that happened. Anyway, now that the month is nearly half over and next time I blink it will be Christmas, I'm going to get busy and post some of my favorite holiday recipes.

Lets start with some easy stuff.

Fudge


This is actually the Fantasy Fudge recipe on the back of the Kraft Marshmallow Creme jar. It's easy and takes very little time to make, and you can change it up to make different flavors. Chocolate is the best though.

Here's what you need:

1 1/2 sticks butter
3 cups sugar
2/3 cup evaporated milk (one of those small 5 oz cans = 2/3 cup)
1 12oz pkg semi-sweet chocolate chips
1 7oz jar marshmallow creme
1 cup chopped walnuts
1 tsp vanilla

Line a 9 x 13 pan with foil and butter the foil, or just butter the pan. I use foil because then I can lift the whole thing out of the pan to cut it.

Melt evaporated milk, sugar and butter in a saucepan.


Bring it to a full rolling boil over medium heat, stirring constantly. Boil for 5 minutes - set your timer. Keep stirring. When 5 minutes is up, remove from heat. Stir in chocolate chips until melted. Fold in marshmallow creme.


Once the chocolate and marshmallow is thoroughly mixed together, it will be beautiful and glossy like this:


Mix in the vanilla and nuts. Pour into pan, set pan on cooling rack and cool at room temperature. Cut into small squares when cool.


Now, you can leave the nuts out of you don't like them. You can also make different flavors by changing the flavor of the chips. Use white chips and add pecans, Reeses peanut butter chips and chopped peanuts, or use those Andes mint baking chips and substitute peppermint extract for the vanilla. Use your imagination!

````````````````````````````````````````````````````````````````````````````````````````````

Here's another extremely yummy treat that is similar to a fudge. I have been making this every year for all of 2 decades. The recipe came from a former co-worker. We thought it would be fun to put together a booklet of recipes, and then we made everything and had a tasting party. One bite of this was pure bliss. I am providing the original recipe here, but I usually leave out the coconut, and sometimes I have even left out the marshmallows.

Christmas Bars


Don't ask, because I have no idea why these are called Christmas Bars. Just call it a mouthful of yummy peanut-buttery-butterscotch goodness.

1 stick butter
1/4 tsp Butter Flavoring
1 cup chunky peanut butter
1 12oz pkg butterscotch chips
1/2 tsp Maple Flavoring
1/2 tsp Burnt Sugar Flavoring
3/4 cup coconut (optional)
1/2 10oz pkg mini marshmallows


Melt butter, peanut butter, butterscotch chips and butter flavoring in the microwave. Set aside and cool for about 15 minutes.


Stir in maple and burnt sugar flavors. Fold in coconut and marshmallows. Press into a 9 x 9 inch square pan (I use an 11 x 7 inch pan) and cool until firm. Cut into squares.

You can find Butter and Maple flavoring in most stores. I get the Burnt Sugar flavoring at HyVee.

````````````````````````````````````````````````````````````````````````````````````````````

OK, lets do one more. I got this one about 20 years ago from another former co-worker. It's also very simple and really, really good.


Salted Nut Roll Bars


1 cup peanut butter
2 lbs white almond bark
3 cups Rice Krispies
2 cups dry roasted peanuts (chopped)
2 cups mini marshmallows

Chop the peanuts. It doesn't matter how finely you chop them, it just depends on how big of peanut chunks you like. I just gave mine a quick rough chop.


Melt peanut butter and almond bark in microwave. Mix well.


Stir in cereal, peanuts and marshmallows. Spread into buttered jelly roll pan. Refrigerate until firm. (I let mine set at room temperature and it was fine.) Cut into squares.


That's enough for now, but I'll be back soon with some great cookies!

Wednesday, December 8, 2010

Chicken Piccata


One of the perks of my job as a nurse practitioner is that I get to have lunch in the medical staff dining room on weekdays. They set up a decent salad bar, and several choices of hot dishes and sides.. I won't mention the desserts, because today I want to take a break from all the sweetness that abounds during this time of year. Besides, I need to leave that stuff alone anyway! Unfortunately, it's still "hospital food", and the Chicken Piccata I had yesterday left me really hungry for Chicken Piccata made somewhere other than the hospital kitchen. The hospital version was certainly edible, but the flour coating was falling off in big, sticky sheets, I had to use my imagination to appreciate much in the way of lemon flavor, and I think mine had all of 3 capers on it. I shouldn't complain though, because I could have been eating cafeteria food, and I'm guessing they probably weren't serving Chicken Piccata in the cafeteria.

Chicken Piccata is a really simple dish to make, so I don't know why I haven't tried it at home before. It's really just a tenderized chicken breast simmered in a simple lemony sauce made with either chicken stock or white wine, and some capers.

Capers are what make it special, I think. I love that piquant burst of flavor that fills your mouth when you bite into them. Capers are the immature flower buds of a perennial plant which is native to the Mediterranean and some parts of Asia. After harvesting, the buds are dried in the sun and then pickled in a brine made with vinegar or wine. The ones I used were packaged in balsamic vinegar. Yum! You can find capers in the grocery store next to the pickles and olives.


When it came down to searching for the perfect recipe, I just did a Google search for Chicken Piccata, and got a whole list of sites. This is really because I was too lazy to search through all my cookbooks. I looked at several of them - myrecipes.com, simplyrecipes.com, epicurious.com, squidoo.com to name a few... there are more. The one I settled on, though, came from one of my favorite Food Network stars, Giada De Laurentiis on foodnetwork.com. I liked her recipe the best because it used basic ingredients and looked easy to make. I have 3 of Giada's cookbooks, and her Turkey Meatballs with Marinara Sauce is a staple at my house. Next time I make a batch I will be sure and share it with you! And yes it's true, I was even too lazy to look through my Giada cookbooks.

I keep trying to post links, but for some reason they don't show up in the finished post, so if any of you have any helpful hints for me I would love to hear from you!


Giada's Chicken Piccata

2 skinless and boneless chicken breasts, butterflied and then cut in half

Sea salt (regular salt is fine here) and freshly ground black pepper (or not)

All-purpose flour, for dredging

6 tablespoons unsalted butter

5 tablespoons extra-virgin olive oil

1/3 cup fresh lemon juice

1/2 cup chicken stock

1/4 cup brined capers, rinsed

1/3 cup fresh parsley, chopped (or just stick a sprig or two on the side like I did)

You can see here that I already strayed from the recipe in that I had the cute guy behind the meat counter run a couple of chicken breasts through the tenderizer for me. When you use tenderized chicken, you can cut the finished dish with a fork.


Season chicken with salt and pepper. Dredge chicken in flour and shake off excess.

In a large skillet over medium high heat, melt 2 tablespoons of butter with 3 tablespoons olive oil.

Seriously now, did you think I was really going to measure my oil and butter? For me, it was more like a couple of turns of EVOO (oops, wrong show...) and cut off a few good sized chunks of butter.


When butter and oil start to sizzle, add 2 pieces of chicken and cook for 3 minutes. I only made 2 pieces, so that was easy. (It's okay if you don't time this, just cook it until it is a nice golden brown)


Looking good!


When chicken is browned, flip and cook other side for 3 minutes. Remove and transfer to plate.

Melt 2 more tablespoons butter and add another 2 tablespoons olive oil.

When butter and oil start to sizzle, add the other 2 pieces of chicken and brown both sides in same manner. Remove pan from heat, then remove chicken from pan and set aside on a plate.


Into the pan add the lemon juice, stock and capers.

I used these cute little Meyer lemons I got at Whole Foods.


Return to stove and bring to boil, scraping up brown bits from the pan for extra flavor. Check for seasoning. Return all the chicken to the pan and simmer for 5 minutes.


Remove chicken to platter. Add remaining 2 tablespoons butter to sauce and whisk vigorously. Pour sauce over chicken and garnish with parsley. I thought a couple of lemon slices made it look even more festive.


As you can see, I strayed from the recipe yet again and got a little carried away with the capers. I used the whole jar. I was feeling deprived. It was a bit much, but I think if I had made 4 pieces of chicken like Giada did, it might have been okay. I do have to admit that my husband made a snide remark today about not putting any lemon on his food... so I guess he wasn't a fan. *sigh* Oh well, that's what I get for marrying a regular meat and potatoes guy. This chicken would be darn good even without the sauce, so next time there will just be more lemony goodness for me!


If the link below is not clickable, just copy and paste into your browser window. Enjoy!

http://www.foodnetwork.com/recipes/giada-de-laurentiis/chicken-piccata-recipe2/index.html