Saturday, April 16, 2011

The Best Homemade Trail Mix Ever!


Occasionally I will tune in to the Food Network at an odd time of day and come away very pleasantly surprised. This time it was a show I had never heard of, it was called Five Ingredient Fix. The host is a pretty young lady named Claire Robinson, and not only did she have me glued to the TV for the full 30 minutes, but I came away from just one show with 3 different recipes that I couldn't wait to try. One of them was a whole wheat penne pasta dish with turkey and asparagus made with garlic infused oil and white balsamic - it was so delicious my husband even liked it. Screw Rachael Ray, this chick is hot! She's on at 4:30 Central if you would like to take a peek. This trail mix is one of her recipes from that same show.

This recipe is so, so easy, even a... okay, that's not even funny anymore... was it ever? Seriously though, this is super easy, and it only has 5 ingredients - 6 if you count the light sprinkling of salt. This is a wonderful snack because the combination of these nuts, seeds and cherries packs a nutritional powerhouse of antioxidants, protein, fiber, vitamins and minerals, plus there is no added fat except for what is naturally found in the ingredients. The pumpkin seeds even have cholesterol-lowering phytosterols. I don't want to shock you, but I do know some big words.

The cherries I used are Montmorency dried cherries which are tart pie cherries. This is some added sugar in these, otherwise you wouldn't be able to eat them because your face would shrivel up and fall off from the tartness - 1/4 cup of these has 34 grams of carbs. If you don't like cherries you can always substitute raisins or dried cranberries, or any other dried fruit you like. Go wild.


I got the cherries at Costco, but just so you know, I was in there the other day and the packaging is a little different now. I got this cute jug of Grade B maple syrup along with the rest of the seeds and nuts at Whole Foods.


Grade B maple syrup is darker and has a sharper maple flavor than the lighter Grade A syrups, and is used primarily in cooking and baking. I just want to tip up the jug and drink it. Maple syrup makes everything better. The name of the recipe is Pumpkin Seed Dried Cherry Trail Mix, and here's what you will need to buy:

2 cups raw pumpkin seeds (also called pepitas)
3/4 cup raw sunflower seeds
1 cup slivered blanched almonds
6 Tbsp pure Grade B maple syrup
1 cup dried cherries
Coarse salt (I use Kosher salt for everything)

First, heat your oven to 300 degrees F. Next, line 2 large jelly roll pans with parchment paper. I refuse to be without parchment paper in my kitchen, it saves so much time and makes both baking and cleanup so much easier. Just roll it in the opposite direction to flatten it out because it has a mind of it's own and likes to curl up when you try to lay it down on the pans. Measure your seeds and nuts and dump into a big bowl. The package of pumpkin seeds I had was a little less than 2 cups, but I overfilled the bag with sunflower seeds, so I just made up the difference with those. I always do that when I'm scooping out of those huge bulk containers. I swear it looks like I hardly have any in my bag and it always ends up being enough to feed a large army.

Add 6 Tablespoons of maple syrup and mix until everything is evenly coated. Spread the seed and nut mixture in a single even layer, divided so half goes on each pan. Sprinkle lightly with coarse salt to taste. Don't skip this step, the light saltiness along with the deep flavor of the maple syrup is pure bliss.


Bake for 20 minutes, stirring several times with spatula or wooden spoon, until just golden.

Confessional time - I went rogue and used a stainless steel spoon. I tried to do the stirring thing, and the first time I did it I inadvertantly shut the oven off when I thought I was turning off the timer. Good thing I went back to stir again 5 minutes later! I ended up leaving it in the oven for a full 15 minutes after that without stirring, and it really made no difference. It wasn't sticking together and it wasn't sticking to the parchment paper, so I wouldn't worry too much about stirring. Just check on it periodically during the 20 minute baking time.

Doesn't this look good? Nice and lightly golden brown, and it smells wonderful!


Leave the pans alone and let this cool completely. Go do something else for awhile. When it's cool, the stickiness of the syrup is gone and you are left with clusters of lightly sweet & salty, crunchy, nutty goodness. I carefully lifted up the parchment paper and let it all slide into a clean bowl, but I can see where this could be just asking for trouble. Fortunately, it all landed in the bowl and not on the floor, much to the bitter disappointment of my dogs. Stick your hands in it and break up the chunks - this is so easy, it breaks apart perfectly so not one single seed is stuck together. Mix in the cherries and toss to combine.


This makes 4 cups. Store it in an airtight container at room temperature, but I think I'll have to bag it up into individual servings, because it's really hard to stop once you've tasted it. Enjoy!

Friday, April 15, 2011

Ultimate Comfort Food... Chicken & Dumplings


I never thought dumplings sounded good at all until my sis-in-law Sara made this yummy Food Network recipe when they were back for a visit. Credit goes to Tyler Florence for this one. These dumplings were light, and fluffy, and so, so good... it was hard not to bend over and stick my whole face in the bowl. I'm a little late with publishing this because it was super cold and wintery when I made it back in January, but it's snowing today - on April 15 - my car is in the shop so I can't go anywhere, so I kind of wish we were having this for dinner tonight.

There are 4 parts to this recipe, so plan to make it when you have nothing else to do all day. If you find it too labor intensive you can cut some corners by using a store-bought rotisserie chicken and you can buy cartons of chicken stock in the store, but trust me when I say the effort of making everything from scratch is so, so worth it.

I will list the ingredients and instructions for each part, and then give you a complete shopping list at the end.

Roasted Chicken

1 (3 pound) whole chicken
4 ounces unsalted butter, softened (I only had salted butter and it was fine.)
1 lemon halved and juiced, halves reserved
1/4 cup fresh chopped herbs, such as rosemary, thyme and parsley
1 onion, halved
4 garlic cloves, smashed
Fresh whole herbs, such as rosemary, thyme and parsley sprigs
Salt and freshly ground black pepper

Preheat oven to 375F. Remove the neck and giblets from the cavity of the chicken and discard. (Really? I saved them and threw them in the pot when I made the stock.) Rinse the chicken under cold water, inside and out. Pat dry thoroughly with paper towels.


In a small bowl, mash together the softened butter, lemon juice, and chopped herbs. I had a hard time getting the juice to mix with the butter, so make sure your butter is really soft and the juice is slightly warm.


Rub the herbed butter all over the chicken, as well as under the skin. Stuff the lemon halves, onion, garlic, and whole herbs inside the chicken cavity.

Tie the legs together with kitchen twine. (I skipped this step because after I stuffed everything inside I couldn't get the legs together, so don't worry if you can't do it either.) Okay, those of you with vivid imaginations - stop it. Place the chicken, breast side up, in a roasting pan fitted with a rack. I didn't have a rack, so don't worry about that either, it doesn't make that much difference in the end. Here's what mine looked like before I put it in the oven:


Roast for 1 hour until the meat is no longer pink. Try your best to resist diging in to this gorgeous, delicious bird at this point, because it will be really tempting. Don't do it.


When cool enough to handle, shred the meat, discarding the skin and set aside. (Again, I don't know why you would throw the skin away when you could use it in the stock.. I did.) Reserve the bones for the stock.

Chicken Stock

2 Tablespoons olive oil
2 carrots, cut in large chunks
2 celery stalks, cut in large chunks
1 onion, halved
1 garlic bulb, halved (cut it in half horizontally across the center)
Reserved chicken bones (throw in the skin and giblets)
2 quarts cold water
4 sprigs fresh parsley
4 sprigs fresh thyme
2 bay leaves

Coat a large stockpot with the olive oil and place over medium heat. Add the carrots, celery, onion and garlic halves and saute for 3 minutes.


Add the reserved chicken bones, water, and herbs; simmer for 1 hour.


Strain the stock to remove the solids and set aside.


Dumplings

2 cups flour
1 Tablespoon baking powder (that isn't a typo, you really do need a full Tablespoon)
1 teaspoon salt
2 eggs
3/4 - 1 cup buttermilk

Sift dry ingredients together in a large bowl. In a small bowl, lightly beat the eggs and buttermilk together; pour the liquid into the dry ingredients and gently fold. I did this wrong - I put everything into the bowl and then mixed it. I've done it both ways, and the dumplings turned out just as good either way.


Mix just until the dough comes together, the batter should be thick and cake-like.


Supreme Sauce

2 Tablespoons butter
1 Tablespoon oil
1 Tablespoon salt
1/4 cup + 1 Tablespoon flour
1/2 cup diced carrots
1/2 cup diced celery
3 cloves garlic, minced
2 bay leaves
6 cups chicken stock
1/4 cup heavy cream
Freshly ground black pepper for garnish
Chopped flat-leaf parsley for garnish

This is where the whole dish comes together.


In a Dutch oven, melt the butter and oil over medium heat. Add the celery, carrots, garlic and bay leaves.


Saute until the veggies are soft, about 5 minutes.


Stir in the flour to make a roux. Continue to stir and cook for 2 minutes to coat the flour and remove the starchy taste.


Slowly pour in the chicken stock, 1 cup at a time, stirring well after each addition.
Let simmer until the sauce is thick enough to coat the back of a spoon, about 15 minutes. Stir in heavy cream. Don't panic if your sauce seems runny, it is not supposed to be very thick.


Fold in the shredded chicken into the sauce and bring up to a simmer. Using 2 spoons, carefully drop heaping tablespoonfuls of the dumpling batter into the hot mixture. The dumplings should cover the top of the sauce, but should not be touching or crowded. Mine are a little crowded because there was more dough than there was room in my very large Dutch oven, and I didn't want to throw it out.


Let the dumplings poach for 10-15 minutes until they are firm and puffy. This is why you don't want to crowd the dumplings. They really do puff up and turn out really light and fluffy.


Season with the pepper if you like and garnish with chopped parsley before serving. If you are not a fan of black pepper like me, stop by Penzey's and pick up some of their 4-color peppercorns. They have great flavor but don't burn your mouth. This serves 6 people, and the leftovers are still good heated up the next day.

Yum!


Shopping List

1 3-lb whole chicken
salt
pepper
butter
1 lemon
2 whole bulbs garlic
olive oil
vegetable/canola oil
carrots
celery
2 onions
4 bay leaves
flour
2 eggs
1 c. buttermilk
1/4 cup heavy cream

Tuesday, April 5, 2011

Lobster Salad... Not!

Today I was going to make a lobster salad a'la Barefoot Contessa. It didn't happen, but I thought my short journey into lobster hell would be entertaining, so I'm going to tell you about it anyway. I was feeling pretty feisty this morning after a long, drama-filled weekend. My facebook friends will know what I'm talking about. I was driving down the street and noticed the sign at our local Kroeger affiliate said; "Cooked Lobster $3.99 each". I immediately had a vision of myself as Ina's thinner, prettier, culinary goddess-like little sister... now stop it, I am not responsible for what you just spit on your keyboard... and immediately drove around the block and headed for the store. The reality is, the $3.99 should have been my first clue to run.

Once inside, I checked out the cooler up front where they usually put the specials. I found fish sandwiches wrapped in cellophane. Yuck. Then I eyeballed the Easter candy, managed to walk away from that, and made my way through the entire store, but found no cooked lobster. Maybe they were sold out? Really, who could pass up a bargain like that? My second clue to run was the two gentlemen I encountered near the meat counter. They were dressed in white coats and looked very butcher-like, so I approached them to ask where I might find the $3.99 cooked lobster. They both looked at me as if I had just dropped down from the moon, their faces completely expressionless. Speaking not a word to me, one of them turned around and walked away. The other one said "He will show you where it is." Wow. Could we kick up the people skills just a notch? I dutifully followed the first man as he led me past the processed meats toward the freezers. He looked around, then he walked in a full circle. Don't worry, I didn't follow him around his circle. Finally, he opened the door of one of the freezers and pulled out 2 packages of bright red, frozen lobster. I grabbed a third package and followed him while he went behind the meat counter to print up corrected price labels for the sale price. Take home lesson here... if you can't find something, look for someone with a glimmer of facial expression that doesn't look like he probably lives in his mother's basement, and most of all... don't buy frozen lobster.

I was excited though, this was going to be fun! I planned to print a recipe when I got home, but in my mind I was thinking of what would be good in the salad. I picked up a pretty red bell pepper, celery, and some green onions. Barefoot Contessa actually has an easy recipe for Lobster Salad. She uses (food snob alert!) "good" mayonnaise, celery, capers, fresh dill, salt & pepper, and stuffs it into Belgian Endive leaves. My vision for the dressing was more along the lines of something lighter like Greek yogurt and lemon juice.

I left my frozen little buddies out to thaw. Three hours later they were still frosty and hard as rocks, so I took them out of the package, picked off the ice chunks, and put them in some warm water to speed up the thawing. This was probably not a good idea. I took pictures of them thinking I would blog about it later, but my camera for some reason dumped the pictures. I wish I had them to show you. First of all, in the process of removing the plastic netting I ripped off two of the poor thing's front legs. Why did this make me feel bad? I waited for the PETA protesters to arrive in my front yard. I positioned the legs where they were supposed to be for the picture, and immediately thought of several snarky comments I could make about those three pairs of frozen little eyeballs. Ew.

Once the little guys were thawed enough, I got out my nut cracker and got busy dismembering my new little friends. Doing the claws wasn't bad, but when I got to the bodies I was beginning to think we might not want to eat this. Ripping the little legs off the underbelly reminded me of a giant bug, and I was lucky I maintained my composure long enough to finish the job without dropping the thing like a hot potato and squealing. Once that was done I discovered that I had forgotten about the greenage inside their little bellies. How can such small lobsters have that much poop inside them? Not wanting to touch it, I scraped it out with one of the broken claws, then rinsed it out in the sink. There was nothing I could do about the green stains on the meat, and all this happened while the latest "poop tax" commercial played on the radio. It was pure Karma. Yes, you heard me, I said poop tax. It seems the the city government in Omaha has been talking about taxing toilet paper to help pay for a big federal government mandated sewer overhaul, or something like that, so one of the area plumbers has a commercial where this guy is singing about how he is so fed up he's only going to stand up and pee because they want to tax his poo, and when he gets stopped up he'll just call this plumber. You guys, I can't make this stuff up!

So, now I'm pretty grossed out by this mess, but it's not over yet. When I ripped apart the second and third lobsters, they were filled with some kind of bright red mushy stuff on top of the greenage. As I watched the tiny little red bead-like thingys run down the sink I realized they were probably EGGS. What?? Ew. Again. By this time I know with undeniable certainty that I am not making lobster salad today. I put the meat into a small colander to drain because I could literally squeeze water out of it. I don't know if it was because I put the little crustacean bastards in water or if it was because they had been frozen. I left it in the sink where they drained for awhile, and then when I couldn't take it any more I gave the whole 1/2 cup of water-logged-greenage-stained lobster meat a dignified burial in my garbage can. There wasn't enough meat there to even feed a third grader anyway, and after I cut away the green stained part it just wasn't worth it. *Sigh* At least I am only out 12 dollars. Mock lobster here I come!

Saturday, March 19, 2011

Fresh Mango Salsa


Sometimes you have the best plans for dinner and then something doesn't work out quite right so you resort to plan B. In my case, I'm just doing it all backwards. I found some beautiful tilapia fillets at Whole Foods last week, so I was inspired to make some fresh mango salsa to go with them. I picked up everything I would need, but the best looking mangos were hard as rocks, so I figured I would let them set out on the counter and they would ripen up in a day or two. Wrong! I ended up cooking the fish because I didn't want to put it in the freezer, and well, you know how long fish keeps. The tilapia was delicious, but fresh mango salsa would have made it so much better. It hurt me to watch my hubby smother his with tartar sauce. Ouch. So... now, a week or so later, the mangos are perfectly ripe and ready so I went ahead and made the salsa, but I don't have any fish. *sigh*

Here is what you will need to make this:

3 good sized mangos
1 poblano pepper
1 small red onion
1 bunch fresh cilantro
1 lime

A ripe mango can be any variation of green, red, yellow and orange. the one pictured here was green with a hint of red, and as it ripened it turned more yellow-orange. It is soft when you push on it, but the skin is smooth and not all shriveled up. Mangos have these large, flat pits that make them impossible to cut in half, so the easiest way to deal with these things is to peel it with a paring knife and then slice the fruit off the pit. Don't even try to get it all of because you can't.


Take some of the mango and mash it up in a bowl sort of like a puree. You can do this in a blender, but I didn't feel like getting it out today so I used a potato masher and then ran my knife through the chunks that wouldn't mash.

Take the rest of the mango and dice it into fine little pieces. They don't have to be the same size, some bigger chunks are nice to bite into for that extra burst of sweetness. Mangos are slippery little stinkers, almost slimy, so be super careful with your knife.


Next, dice up a small piece of the poblano pepper. If you want less heat you can use an Anaheim chili instead, or use a jalapeno if you like it hot. Do a fine dice on this, and add about 2 Tablespoons to the bowl.


Do the same with your red onion. You only need 1/3 cup.


Tear off a small handful of cilantro leaves and run your knife through them every which way you can until it's pretty finely chopped. I didn't measure this, but it was about enough to fill up the palm of my hand.


Next cut the lime in half and squeeze all the juice over it. Roll the lime around on the counter first so you'll get as much of juice out as possible. Stir the whole mixture gently until everything is well combined.


Isn't this pretty?


Feel free to adjust the amounts of anything in here to suit your own tastes. I plan to serve this with fish, but I think it would be good on a nice, salty tortilla chip as well. Maybe if I don't make it to the store we'll just eat it anyway!

Monday, January 17, 2011

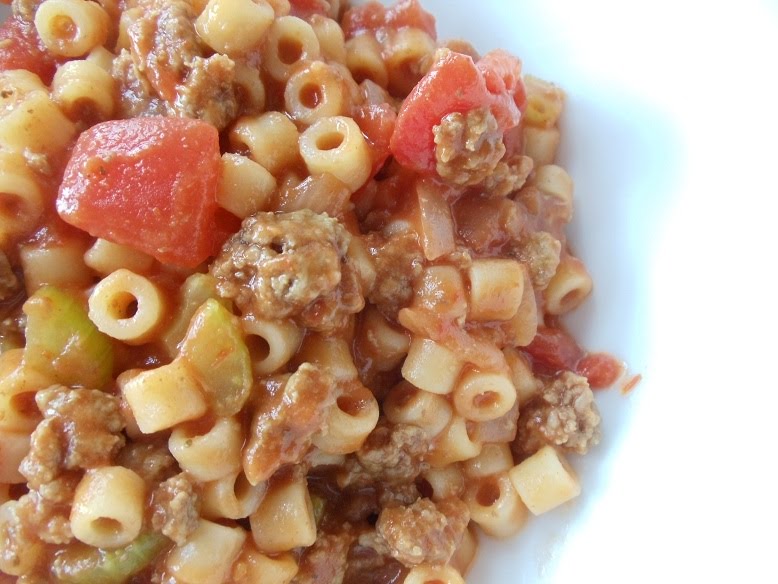
Comfort Food... Mom's Goulash


This recipe didn't come from my mom, it came from a magazine a long, long time ago. It might have been Taste of Home, but it's been so long that I can't remember now. Wherever I got it, it's definitely a keeper! My kids loved this when they were still living at home, and my husband still does.

Goulash is wonderful because you can make it a little bit different every time, you don't have to follow an exact recipe. You can use regular elbow macaroni if you like, but I love the smaller Ditalini when I can find it. Ditalini is sort of like elbow macaroni chopped into smaller pieces.


The recipe given here makes a huge batch, so if you don't have a big family you can cut it in half, but keep the same size can of diced tomatoes. The tomato paste was a new addition this time because it seemed like it needed something more, but I usually don't need to use it. This is just exactly how I made what you see in the pictures.

You can change up the spices too. Sometimes I use Penzey's Smoked Spanish Paprika just to be different. You can spice it up however you like, but the one thing I would not change is the celery salt. That is what sets this apart and makes it so good. The celery seed can be left out if you don't like it, but the celery seed I use is also from Penzey's, and is more ground up so it's not like you are biting into little seeds.

Here's what I used for this batch:

1 box (1 lb) Barilla brand Ditalini pasta (or elbow macaroni)
2 pounds ground beef
1 medium onion, diced
2-3 stalks celery, diced
1 28-oz can diced tomatoes (substitute crushed tomatoes in puree if you don't like big chunks of tomatoes)
2 cans tomato soup
1 small can tomato paste
salt
celery salt
celery seed
Penzey's 4S Seasoned Sea Salt
olive oil

Dice up the onion and celery, and cook in a little bit of oil for a few minutes. It will continue to cook along the way, so you don't want to let them get too soft. Sprinkle a little salt over it.


Add ground beef and cook until browned. Stir in the tomatoes, soup and tomato paste. Stir in spices and let it simmer.

While all that is going on, cook the pasta according to package directions. Don't let it get too done, because it will continue to cook after you add it to the tomato-ground beef mixture. Remember to salt the water generously before you cook the pasta because this is your only chance to season it. Drain it well - shake the colander. You don't want any extra water hiding inside those cute little Ditalinis - I think that may have been the reason why I felt I needed the tomato paste, I may have not drained the pasta well enough and my mixture got a little diluted. You can be the judge of how thick your goulash is and decide whether or not you need it.

Once your pasta is well drained, stir it into the tomato mixture. Let it simmer a little so the flavors will blend. I honestly think this tastes even better the next day.


Enjoy!

Monday, January 10, 2011

Trader Joe's Treats (Garlic Naan Pizza)


Those of you in the Omaha area know that Trader Joe's recently opened a store at One Pacific Place, 105th and Pacific. I've heard a lot about TJ's from friends around the country, so I was very anxious to check it out, but didn't get around to it until a couple of weeks ago. What got me to finally get down there? A recipe for Garlic Naan Pizza that I saw on Trader Joe's Facebook page. This is just one of the recipes using their products in a book called The Unofficial Guide To Trader Joe's. This one looked so good I couldn't wait to try it.. and I was not disappointed. The original recipe came from a "demo lady" in one of their stores.

Naan is a leavened, oven baked flatbread, and is one of the more popular breads in Indian and Pakistani restaurants. I had never tried it before, but now that I have I can see why it is so popular, because it is amazingly good!

This is what it looks like:


The Trader Joe's version is frozen, and comes in garlic flavor and plain. I think what makes this so good is the garlic. It even smells delicious when you open the frozen package! Of course, if you don't like garlic you could always use the plain naan. One package contains 4 pieces of naan, and the package is resealable, so you can just take out what you need and put the rest back in the freezer.

The original recipe uses Trader Joe's fresh Bruschetta for the sauce, but when I was there the bruschetta was sold out, so I improvised and used pizza sauce. Pizza sauce for a pizza... what a concept! They have a fresh pizza sauce in the refrigerated section that is one of the best I have ever tasted. I might never use anything else again - and it's reasonable priced at around $2.99 for a 10 oz tub. This was enough to make 5 of the naan pizzas.

Here is what you will need to buy:

1 package Trader Joe's frozen Garlic Naan (1 pkg has 4 pieces)


1 10-oz tub Trader Joe's fresh Pizza Sauce

1 pkg Trader Joe's Quattro Formaggio Cheese


Garlic Naan Pizza (1 serving)

1 piece frozen garlic naan (use it frozen, don't thaw it out)
2 Tablespoons pizza sauce
1/2 cup cheese

Spread the sauce over the naan, then top with cheese and bake at 400 degrees F. until bread is crispy and cheese is melted. I baked mine for 20 minutes, and next time I will cut a few minutes off that because it was a little more brown than I like, although it was still quite yummy. Just shoot for somewhere between 15 and 20 minutes, and watch it closely the first time.


I made this for my husband and topped it with some pepperoni. He's not one for trying new things, but he loved it. If you use pepperoni, put a little more cheese on top of the pepperoni - I used the "sandwich style" pepperoni and the one I didn't add more cheese to curled up and got extremely crispy. It tasted good but just didn't look very nice. I did use a bit more sauce and cheese than the recipe calls for.. actually I didn't measure anything, and I still got 5 pizzas from that tub of sauce.

It's been quite awhile since I have found something so good that is also so easy to make!

Sunday, January 2, 2011

Buttery Pecan Toffee


I know, I know, the holidays are over, but since so many unforseen things kept me from getting any cookies baked this year I thought I would share just one more of my favorite go-to recipes for Christmas treats. I have seen other toffee recipes with more ingredients, so I think it's funny that people often don't believe me when I way this is just basically nothing more than butter and sugar. When I first started making it, I probably threw out 20 pounds of butter and sugar just trying to get it right because the actual recipe just says "cook until it is the color of toffee". I had no idea how long to cook it or how high the heat should be, so I just kept trying until I got it right, and it was SO worth it. Really, it's not that hard once you get the hang of judging the color of the toffee as it cooks. If I had step by step pictures of what it was supposed to look like along the way I would have gotten it right a lot sooner... and now that I have done that for you, I am thrilled to share what I've learned!

The original recipe is called "Elegant Toffee", and it came from my sis-in-law, Sara. She brought some along one year when they came home for Christmas, and I had to have the recipe because it was ridiculously good. Her version is a bit more labor intensive, because she first pours the toffee over whole almonds, and then breaks it up after it has cooled, dips each piece in chocolate, and then rolls the whole thing in crushed walnuts. Mmm... it's not only delicious, but it looks beautiful as well. I prefer pecans though, and I wanted more toffee and less chocolate, so I adapted it to make it the way I like it, and a lot less work.

Here is what you will need to make this:

1 cup sugar

1 cup butter

Pecans (either whole or chopped.. I use chopped)

A handful of chocolate chips

Pecan meal or pecan cookie pieces (Fisher makes these, they are just really finely chopped pecans.. you could even do this yourself if you want.)

First, butter a large jelly roll pan. You can either butter the pan, line it with foil and butter the foil for easier cleanup, or use the non-stick foil. Sprinkle the pecans rather densely in the center. Whether you use chopped pecans or whole, just use a lot. You don't have to measure any certain amount.. I just think the finished toffee is better if there are a LOT of pecans in it.


Get a small, heavy saucepan. I use an old Club Aluminum pot that used to belong to my grandmother. I love it because it has a wooden handle and I think of Grandma whenever I use it.

Melt the butter and sugar together over medium-high heat. One of the problems I had at first was that my butter and sugar mixture kept separating while it was cooking. I figured out that this was because I didn't have the heat high enough. If this happens to you, just turn up your heat a little, keep stirring, and eventually it will come back together and be fine.


Once it starts melting, you absolutely MUST stir it continuously the whole time. Do not walk away from this or it won't work! The mixture will come to a bubbly boil and will look like pudding.


Keep stirring and you will notice the mixture slowly begin to change color and consistency.


Keep stirring.


This is the color you are going for:


The darkened areas are because I stopped stirring briefly to take the photo, you don't want this, so DON'T STOP STIRRING! When it turns this pretty toffee color, it does so very quickly, so watch it closely.. and did I mention that you have to keep stirring?

The moment your mixture turns this color, immediately pour it over the pecans and spread it as quickly as you can to the desired thickness. It sets up very quickly, so do the best you can. Don't worry about the bubbles, they will go away as it cools. Remember that this mixture will be extremely hot, so be very careful! It will look like a misshapen glob on your pan, and don't worry if you can't get all of the pecans covered. Just use them in the next batch. Because just one batch is never enough. Don't try to double this to save time, it won't work.


Wait a few minutes for it to set, and then sprinkle some chocolate chips over the toffee. You can see the mine have sunken in a bit, but just leave them alone and it will be fine. I use semi-sweet, but you could use milk-chocolate too if you like that better, or leave the chocolate off altogether if you don't like it. Seriously, I actually know someone who hates chocolate.. I can't make stuff like that up. Anyway, place another cookie sheet on top of your pan to help melt the chocolate more quickly, then spread it all over. Spreading chocolate all over sounds so naughty... okay, focus. Are you still with me?


While the chocolate is still nice and melty, sprinkle the finely chopped pecans on top. Once I found pecan meal in the store, which I really liked for this because the pecans were so finally ground they were almost like dust. Just a light dusting was perfect, but I have never been able to find it again, and I'm too lazy to get out whatever gadget I might need to do it myself, so I use the "cookie pieces".


It's best to let this cool overnight before you try and break it up into pieces because you want it completely cool and the chocolate needs plenty of time to cool and harden. This is one of those treats that when you take that first bite everything goes blank and all you can do is roll your eyes and say Mmmmmm.. over and over...

Follow Me on Pinterest